Description
OpenMeetings 2.1 or later is required to use clustering. One database is used for all OpenMeetings servers, so all database tables are shared across OM instances. Certain folders should be shared between all servers to allow access to the files/recording.
Configuration
- Multiple OM servers should be set up as described in Installation
- All servers should be configured to have same Time zone (To avoid Schedulers to drop user sessions as outdated)
- All servers should be configured to use the same DB
Network
Multicast should be set up on all servers
Here are the steps for *nix like systems Reference article
- Check your network interface supports multicast by running the following command in a terminal window:
When you seeifconfig -aMULTICASTagainst your network interface, it means your kernel is compiled with Multicast option and your network interface supports it. - Check if multicast routing is configured:
If you don’t see an IP in the range ofnetstat -nr224.0.0.0 – 239.255.255.255in the first table, it means you need to add your desired mutlicast address to your routes table. - To add the multicast address:
NOTE: ensuresudo route add -net 224.0.0.0 netmask 240.0.0.0 dev eth0eth0corresponds to your network interface name
Make sure you run this command on all servers you want to be multicast enabled. - Using netstat check if the multicast IP is visible in your route table (see step 2.)
- Using tcpdump and ping check if your server is able to multicast.
Run the following command on all the servers.
Run the following command on any server.sudo tcpdump -ni eth0 host 224.0.0.0
Check all servers receiving pingsping -t 1 -c 2 224.0.0.0 - Run
to disable multicastsudo route -v delete -net 224.0.0.0 netmask 240.0.0.0
Database
All servers should be configured to use the same database. It can be on the server or on the one node of the cluster.
NOTE: Db other than H2 should be used
- Add users who can connect to the database remotely
- Update
/opt/om/webapps/openmeetings/WEB-INF/classes/META-INF/persistence.xmlset correct server address, login and password. Also uncomment following line:<property name="openjpa.RemoteCommitProvider" value="tcp(Addresses=127.0.0.1)" /> -
IMPORTANT: Please ensure your startup scripts has OpenJPA black/white list definition
Here is an example:
JAVA_OPTS="-Dopenjpa.serialization.class.blacklist=* -Dopenjpa.serialization.class.whitelist=[B,java.util,org.apache.openjpa,org.apache.openmeetings.db.entity"
File systems
If files and recordings using the same physical folders the files and recordings will be available for each node. You can do this using Samba or NFS, for example. For using NFS do the following:
- To ease upgrade process set OM data dir to some external folder: for ex. /opt/omdata
- Install NFS to the data server. In the file
/etc/exportsadd the following lines:
Here 10.1.1.2 - is node ip for NFS remote access. Add these lines for all nodes except node with folders./opt/omdata 10.1.1.2(rw,sync,no_subtree_check,no_root_squash) - Install NFS common tools to other nodes. In the file
/etc/fstabdo the following:
Here 10.1.1.1 – data server ip. And run the command:10.1.1.1:/opt/omdata /opt/omdata nfs timeo=50,hard,intrmount -a
OM nodes configuration
-
In the file
/opt/om/webapps/openmeetings/WEB-INF/classes/hazelcast.xml:- Set
instance-namefor each server to unique value - Set
server.urlfor each server to full public URL of this server (please NOTE using of numeric IP address might broke HTTPS)) - Comment out/delete following blocks:
<network>
	<join>
		<auto-detection enabled="false"/>
		<multicast enabled="false"/>
		<tcp-ip enabled="false"/>
		<aws enabled="false"/>
	</join>
</network>
<property name="hazelcast.discovery.enabled">false</property> - Un-comment following block (ensure it contains valip parameters):
<network> <join> <multicast enabled="true"> <multicast-group>224.0.0.0</multicast-group> <multicast-port>54327</multicast-port> <multicast-time-to-live>32</multicast-time-to-live> <multicast-timeout-seconds>2</multicast-timeout-seconds> </multicast> </join> <interfaces enabled="true"> <interface>192.168.1.*</interface> </interfaces> </network> - In case there are more than one network interface with multicast support and/or additional hazelcast configuration is required Based on the following documentation: https://docs.hazelcast.org/docs/4.0/manual/html-single/index.html
- Set
Ensure everything works as expected
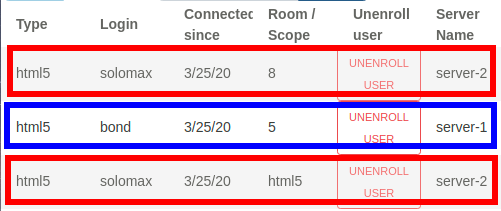
- Set up the cluster and login with two users, go to the same room (also check before room entering that the status page with the room list shows the correct number of participants before entering the room). You should login to the same server initially, the server will redirect you for the conference room to the appropriate server automatically. Both users should be in the same room.
- Do the same with only two users but go to _different_ rooms. The calculation should send both users to different servers, cause based on the calculation two different rooms on a cluster with two nodes should go exactly one room for each node. You can now login really to node1 and node2 of your cluster while those users are loggedin and go to
Administration > Connectionsand check in the column "Server Name" where they are located. They should be on different server.