CalDAV and Google Calendar integration
Introduction
This integration brings the ability to use an External CalDAV server or a Google Calendar. Till now the CalDAV server support includes, bidirectional access, but Google Calendar for now supports only a read-only access.
Two types of external calendar available:
- CalDAV Calendar
- Google Calendar
CalDAV Calendar
On the Calendar Page, after selecting the "Add External Calendar", you should see the Dialog Box as shown.
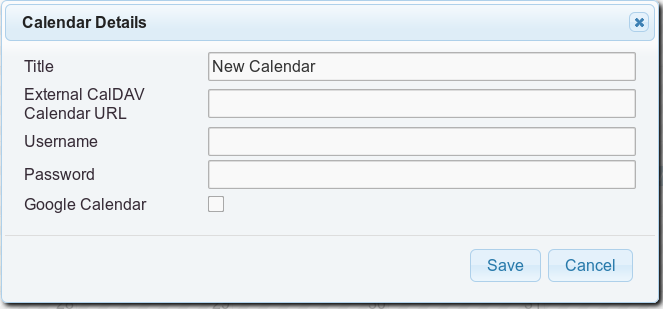
By default it should be as shown. In the Title field, it'll be Display Title of the Calendar. The External CalDAV URL, will be either the URL to your Calendar or to the User Principal. Along with this provide the credentials to the Calendar Server, if necessary.
In case the URL is the User Principal, then all the Calendars in the Principal will be added to the Calendar page.
Google Calendar
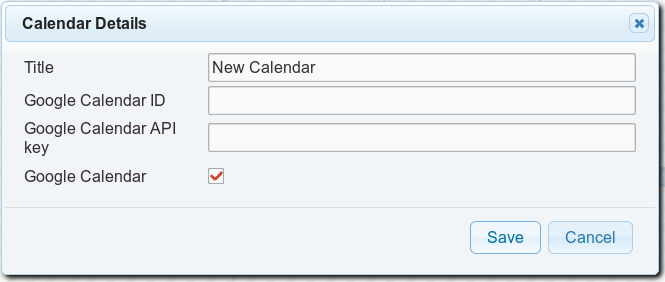
When the Google Calendar Checkbox is selected, then the calendar is a Google Calendar. The two options, should be about the Google Calendar ID and the API Access Key. To know about how get those, follow the steps below.
First we, need to make a Google Calendar API key.
- Go to the Google Developer Console and create a new project (it might take a second).
- Once in the project, go to APIs & auth > APIs on the sidebar.
- Find "Calendar API" in the list and turn it ON.
- On the sidebar, click APIs & auth > Credentials.
- In the "Public API access" section, click "Create new Key".
- Choose "Browser key".
- If you know what domains will host your calendar, enter them into the box. Otherwise, leave it blank. You can always change it later.
- Your new API key will appear. It might take second or two before it starts working.
Make your Google Calendar public:
- In the Google Calendar interface, locate the "My calendars" area on the left.
- Hover over the calendar you need and click the downward arrow.
- A menu will appear. Click "Share this Calendar".
- Check "Make this calendar public".
- Make sure "Share only my free/busy information" is unchecked.
- Click "Save".
Obtain your Google Calendar's ID:
- In the Google Calendar interface, locate the "My calendars" area on the left.
- Hover over the calendar you need and click the downward arrow.
- A menu will appear. Click "Calendar settings".
- In the "Calendar Address" section of the screen, you will see your Calendar ID. It will look something like "abcd1234@group.calendar.google.com".
Place these two values in the Dialog Box's fields. Note, at the current state the Google Calendar events, may not be visible on the page, after adding. If you've done the aforementioned steps correctly, then, just Reload the page or go out of the Calendar page for a moment and come back.
Note: The Steps mentioned have been taken from here.